


Types of Berries You Can Use In This Recipe:
- Dewberry
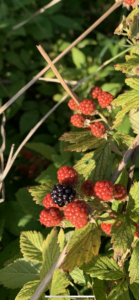
- Blackberry
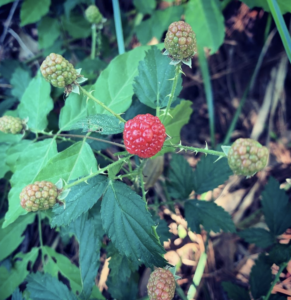
- Raspberry
- Blueberry
- Strawberry
Ingredients
- 3 cups sugar
- zest from 1 lime, lemon, or orange
- 2 tablespoons lime, lemon, or orange juice
- 6 pounds ripe and near ripe dewberries, blackberries, or raspberries
It’s important to include about 2 pounds worth of tart, under-ripened berries in this 6 pound recipe. Using less-ripe berries provides pectin, so we won’t need to add store bought pectin. If you don’t have access to under-ripened berries, you’ll want to pick up enough from the store for one batch of jam (roughly 3 fluid ounces of pectin).
A Little About Pectin…
Pectin is a special type of sugar that can be found naturally in many fruits, especially citrus fruits. Regardless of the type of fruit, all tart and under-ripened fruit has higher pectin content than the fruit has when it is ripened and sweet. Pectin is also found in higher concentration in fruit peels and skins.
Jam requires pectin to set and have the gel texture that’s expected in jams and jellies, and many people rely on store bought pectin for their jams. For some of our recipes, we certainly will include pectin because of the fruits we’re working with, but we try to avoid adding store bought pectin whenever possible.
Bulk produced, store bought pectin is often derived from corn products such as high fructose corn syrup. For this reason many people have started to avoid it and have reverted to relying on natural pectin sources. For this recipe, we will use lemon or orange juice and zest, and also under-ripened berries as our pectin source and this will provide enough pectin for the jam to set properly.
Recipe
1. Wash the berries
Thoroughly wash berries and pick out any that look dry, eaten by bugs, or otherwise less desirable. If you wouldn’t want it eat the berry when it’s fresh and unprocessed, then it won’t usually make great jam either. This is especially true for foraged berries – look out for fly larva and other bugs. Over-ripened berries can contain fruit fly and larva along with other bugs so it’s important to check what you pick and clean it thoroughly.
2. Soak in sugar overnight
In a large bowl, mix the berries with the sugar, along with the citrus fruit zest and juice, then allow the berries to macerate over night or for 12-24 hours. This helps the added sugar combine with the natural sugars in the berries and helps soften the skin of the fruit.
3. Set the Jam at 220˚F
After macerating the berries, place the berry and sugar mixture into a large sauce pot and begin heating the pot to a boil, ensuring that you reach 220˚F for at least a minute to allow the pectin to fully react with the sugar and acids in the jam. You should apply a near constant stir to make sure the jam doesn’t burn and the sugars don’t caramelize.
It’s very important the entire batch reaches 220˚F and holds that temperature long enough to activate the pectin. If this process is not done correctly, the jam may not set properly and will have a runny consistency. If the pot isn’t over full and the jam isn’t splattering too much, I’ll keep it at this heat for about two minutes just to be safe.
4. Boil down to desired consistency
Once the jam is set, you can begin to boil it down to your desired consistency. I usually reduce the heat to prevent burning and it usually allows me to stir the pot every 3-5 minutes instead of constantly. Since the jam is set already, it should have the right consistency. But the berries for this recipe tend to be more juice based and don’t have much skin, pulp, fruit flesh or “meat,” so I like to cook it down a bit to help give the jam more depth and body.
5. Test the jam’s consistency before canning
To test the consistency of your jam and make sure that it has set properly can be done quite easily. This is a very useful trick and important to do before canning a large batch of jam to save yourself a lot of grief from runny jam.
Simply stick a plate in the freezer for 2-5 minutes to get it cold; ceramic, glass, or porcelain plates are best but plastic will work. Once the plate is cold, place a teaspoon of jam onto the plate then put the plate back in the freezer for two minutes. When chilled in this manner, the jam that comes out the freezer after two minutes will be very similar to the jam once it’s cooled off.
If the jam has the consistency of a syrup, you may consider adding more pectin. If the consistency is almost like gel, but runs a bit, you may consider cooking it down for an additional 5-15 minutes and again checking the jam’s set by using the freezer and plate method above.
5. Can or refrigerate the jam
When you’re satisfied with the jam’s consistency, remove the jam from heat or bring to a very low temperature. The jam will last about one week in the refrigerator or can be processed and canned in a high temperature water bath to be made shelf stable for the pantry or dry good storage for up to one year.